We provide the simple user guide for your reference.
Read NowMezzofy Cashier V1.0
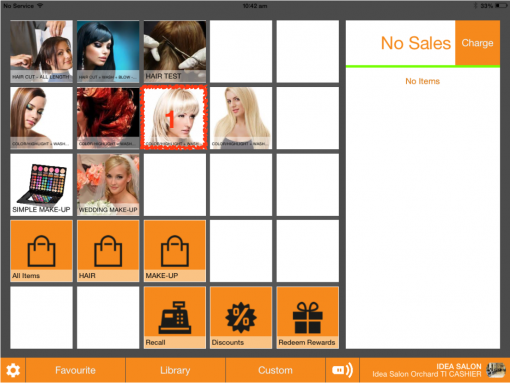
Favourite
How to manage your favourite.
Transaction
How to create and manage transactions.
History Transaction
How to handle history transaction.
Cash Management
Support cash management in tracking and reporting distributed via email.
Reports
How to check and print sales reports.
Settings
How to manage settings for Mezzofy CASHIER.
Favourite
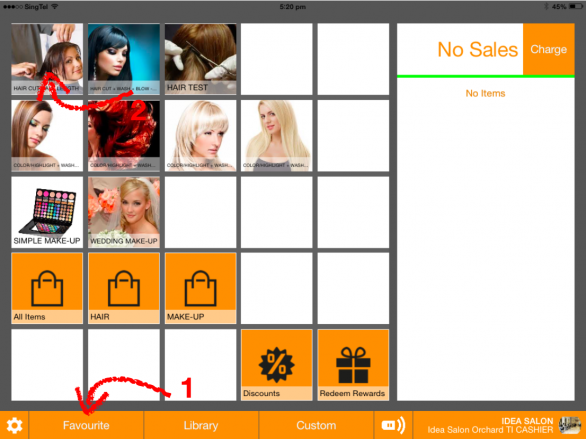
1.0 How to add favourite items?
You can put up to 50 items in your favourite screen (please swap to left to have more boxes). To add your favourite items, please follow the below steps:
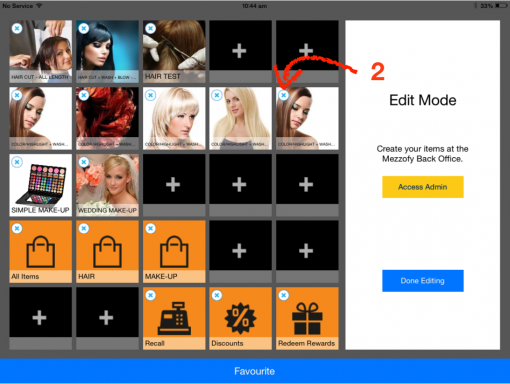
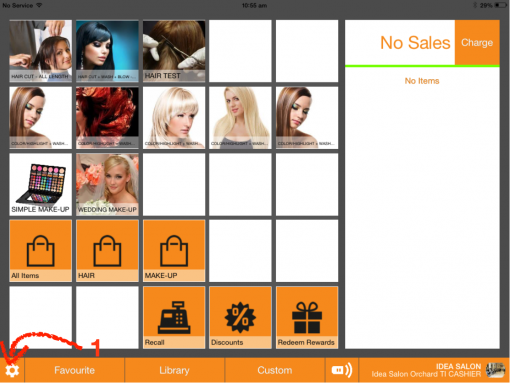
1.1 Tab and hold on any of the box for 2 seconds to enter the Edit Mode.
1.2 Tab on the where you want to place the item.
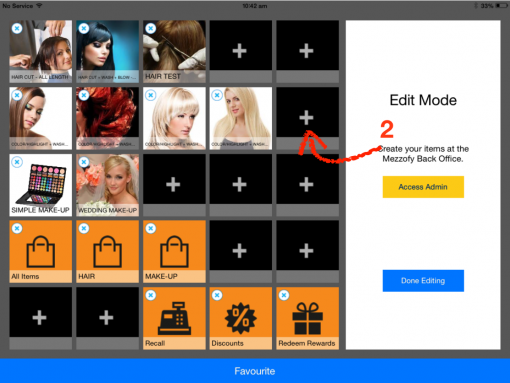
1.3 Select the category or item from the list.
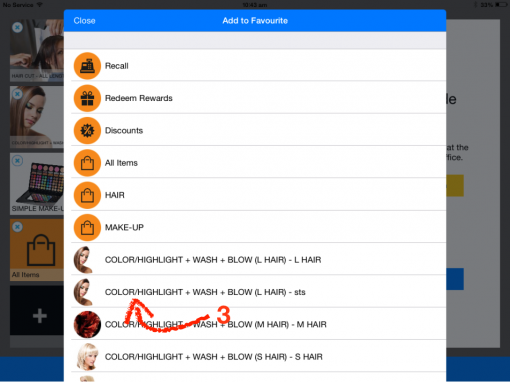
1.4 Item will appear in the selected box. Repeat step 1.2 - 1.4 to continue adding item to Favourite.
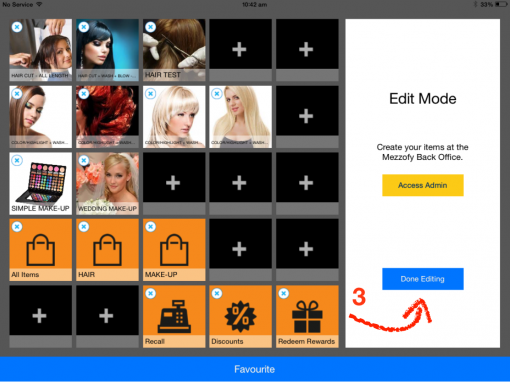
1.5 Tab on ‘Done Editing’ to exit Edit Mode.
1.6 Now you have your own favourite screen.

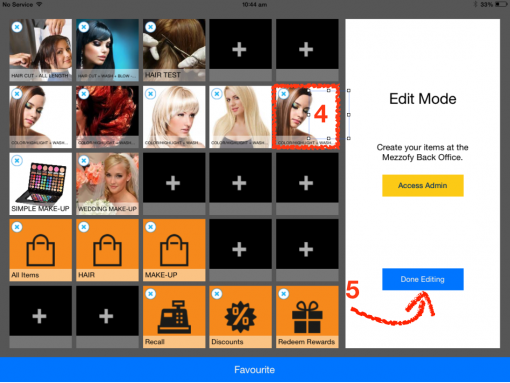
2.0 How to remove favourite item?
To remove your favourite items, please follow the below steps:
2.1 Tab and hold on any of the box for 2 seconds to enter the Edit Mode.
2.2 Tab on the where you want to remove the item.
2.3 Tab on ‘Done Editing’ to exit Edit Mode.
2.4 Now the item has been removed from your favourite screen.

Transaction
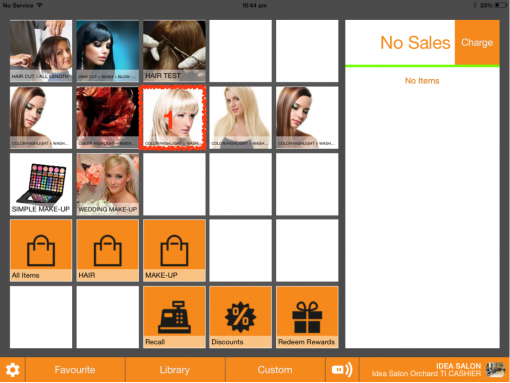
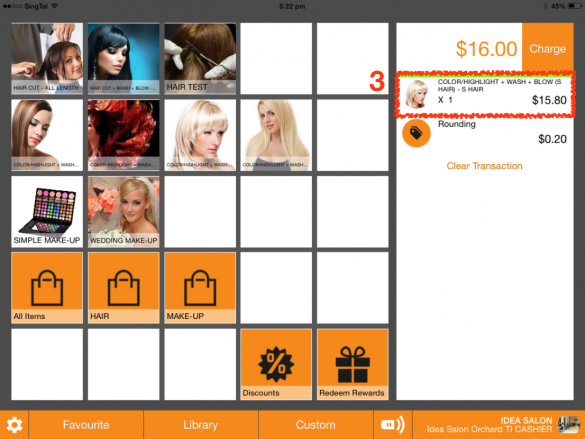
3.0 How to add items into Cart?
To add the items into cart, please follow the below steps:
3.1 Tab on the ‘Favourite’.
3.2 Tab on the item in Favourite.
3.3 Items will be added in the cart.
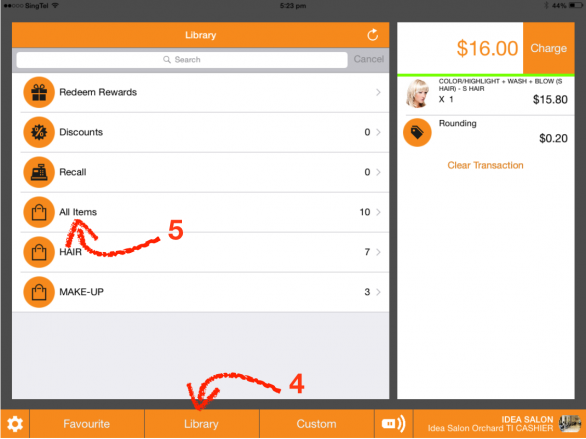
3.4 For item not in the favourite, tab on the ‘Library’.
3.5 Select ‘All Items’.
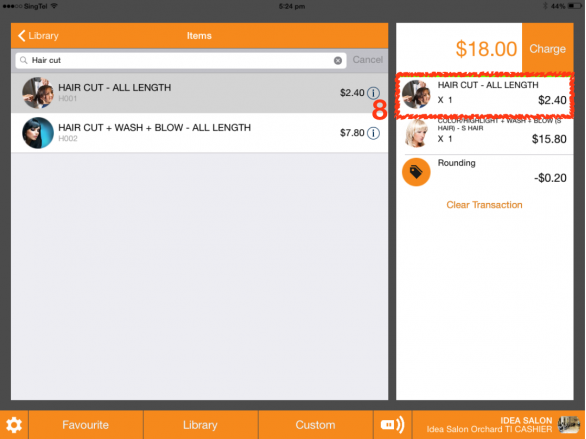
3.6 Search the item.
3.7 Tab on the item.

3.8 Items will be added in the cart.
You might also want to see:-
How to add Custom items into cart? How to tender order? How to do multi tender? Top 4.0 How to add Custom items into Cart?
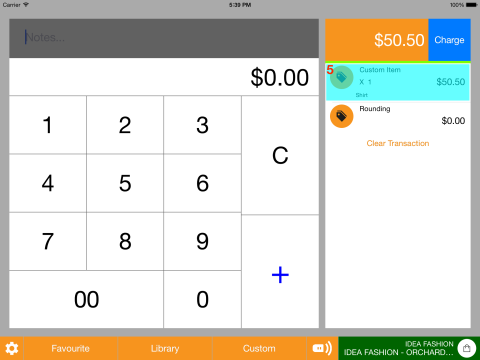
To add the Custom items into cart, please follow the below steps:
4.1 Tab on the ‘Custom’.
4.2 Enter the item amount using the number pad. You can tap on the ‘C’ to cancel the amount.
4.3 Enter the remark for the item. (Optional)
4.4 Tab on the to add the item.
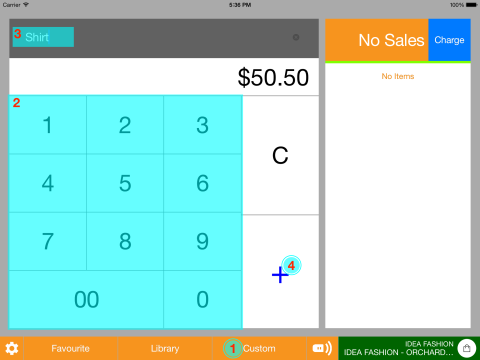
4.5 Items will be added in the cart.
You might also want to see:-
How to add items into cart? How to tender order? How to do multi tender? Top 5.0 How to tender order?
To tender the order, please follow the below steps:
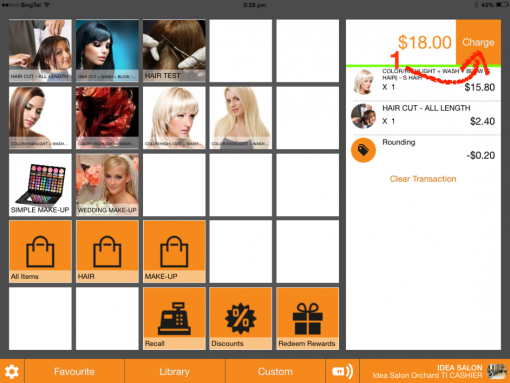
5.1 Tab on the ‘Charge’.
5.2 For Cash payment, tab on the amount at ‘To Pay’.
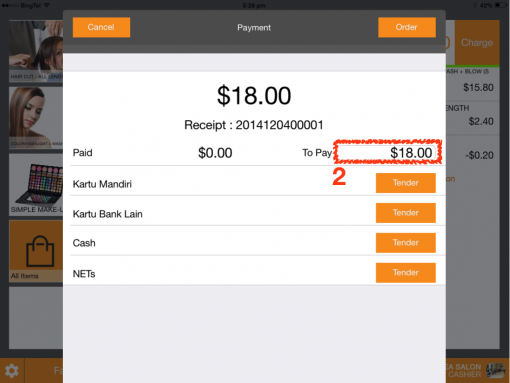
5.3 Use the number pad to enter the cash amount customer has given.
5.4 Tab on the ‘Done’.
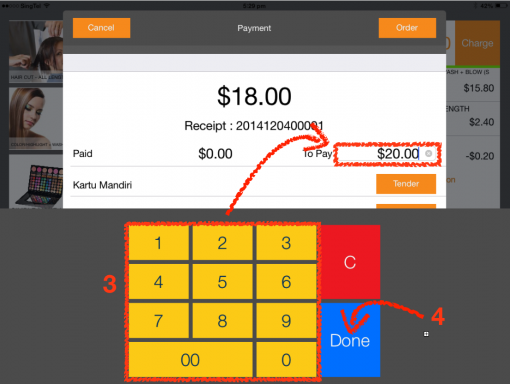
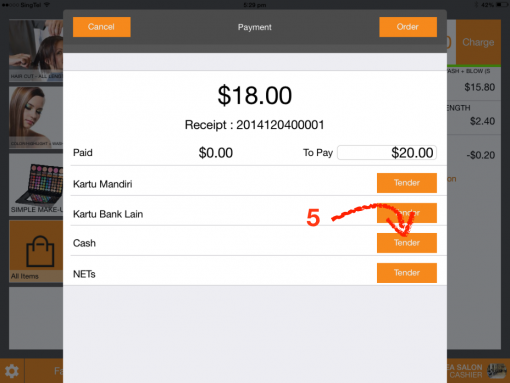
5.5 Tab on the ‘Tender’ under Cash.
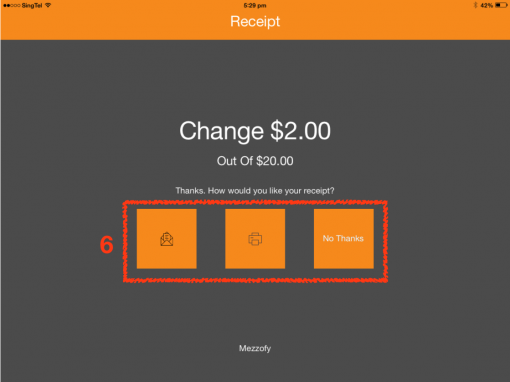
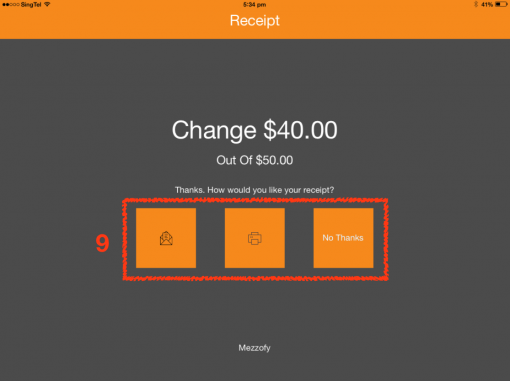
5.6 Select the Receipt type:
– Tab on the ‘Email’: Email the electronic receipt to customer.
– Tab on the ‘Print’: Print the receipt from Cashier Receipt Printer.
– Tab on the ‘No Thanks’ : No receipt required by customer.
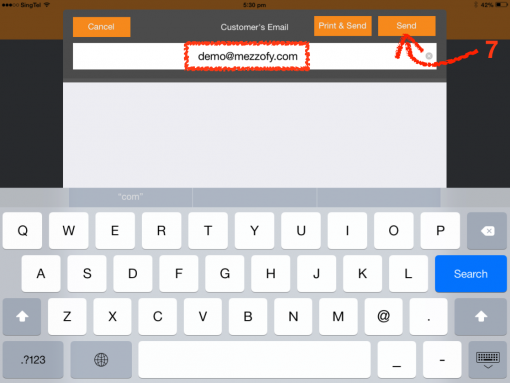
5.7 For ‘Email’: Enter the email address, and tab on the ‘Send’.
You might also want to see:-
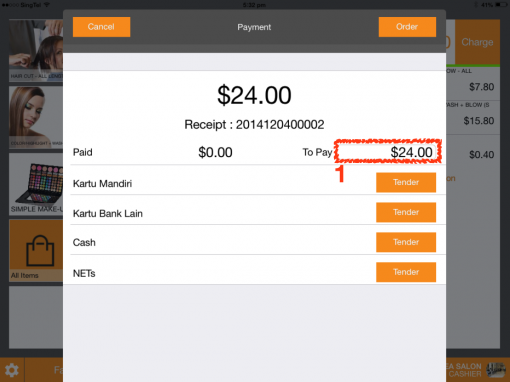
How to add items into cart? How to add Custom items into cart? How to do multi tender? How to enable/disable the tender/payment mode? Top 6.0 How to do multi tender?
To tender the transaction with multi tender mode, please follow the below steps:
(Note: Cash always be the last tender mode if there is.)
6.1 Tab on the amount at ‘To Pay’.
6.2 Use the number pad to enter the amount customer make for the 1st tender mode.
6.3 Tab on the ‘Done’.
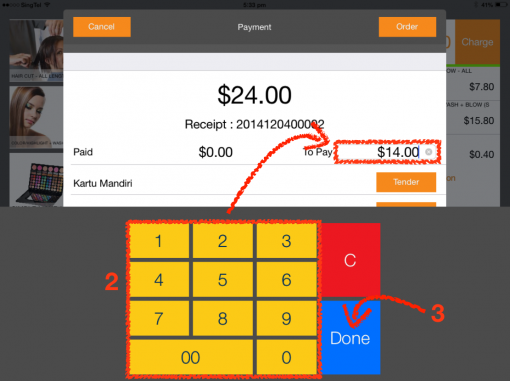
6.4 Tap on the 1st tender mode, eg. NETs. Amount will be appear at the NETs, and balance amount will be recalculated at the ‘To Pay’.
6.5 If customer pay the balance using Cash tender mode. Tap on the amount at ‘To Pay’.
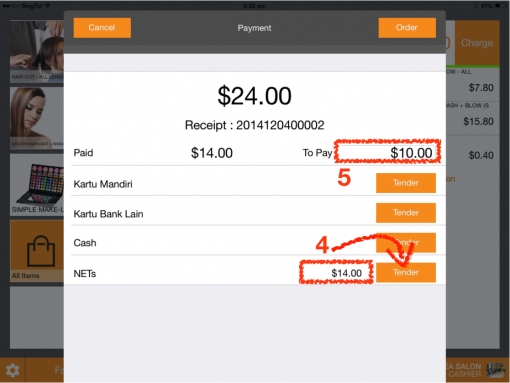
6.6 Use the number pad to enter the cash amount customer has given.
6.7 Tab on the ‘Done’.

6.8 Tab on the ‘Tender’ under Cash.
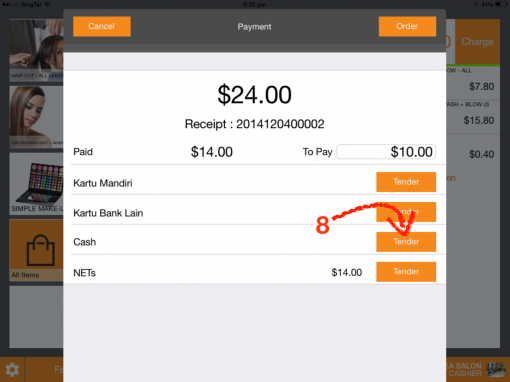
6.9 Select the Receipt type.
You might also want to see:-
How to add items into cart? How to add Custom items into cart? How to tender order? How to enable/disable the tender/payment mode? Top 7.0 How to issue refund?
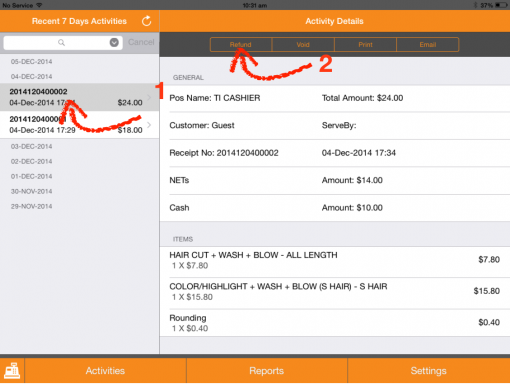
To issue a refund, please follow the below steps:
7.1 Select the transaction.
7.2 Tab on the ‘Refund’.
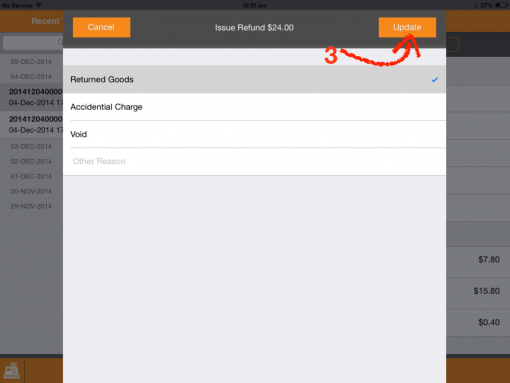
7.3 Select any preset refund reason or enter Other Reason in the text box, tab ‘Update’ to confirm the refund.
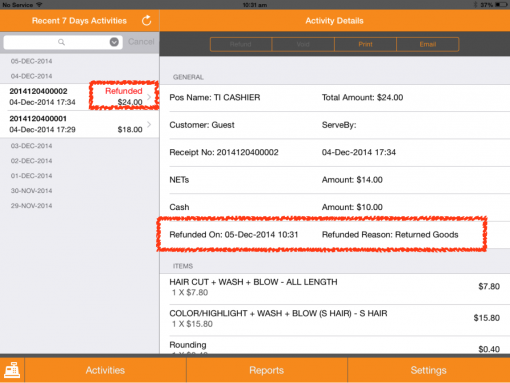
7.4 The Refunded will be indicated for the transaction.
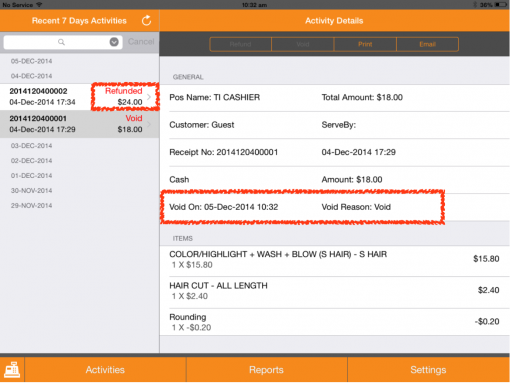
8.0 How to void transaction?
To void the transaction, please follow the below steps:
8.1 Select the transaction.
8.2 Tab on the ‘Void’.
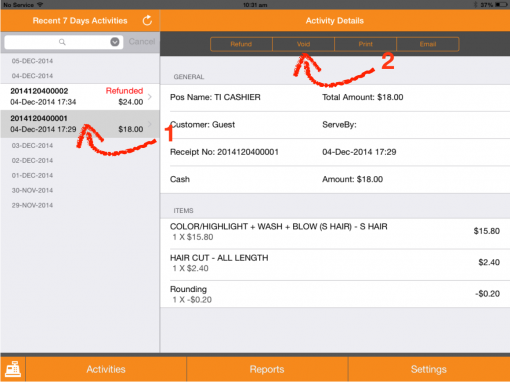
8.3 Select any preset void reason or enter Other Reason in the text box, tab ‘Update’ to confirm the void.
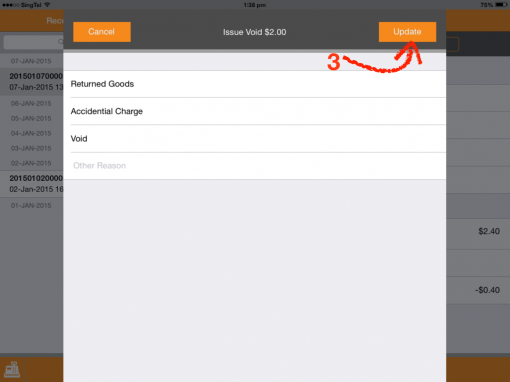
8.4 The Void will be indicated for the transaction.
History Transaction
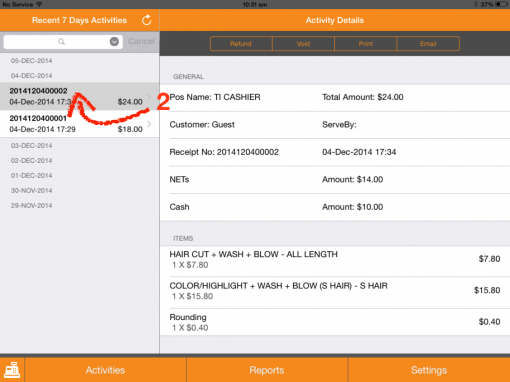
9.0 How to check the history transaction?
Activities kept passed 7 days history transactions in Cashier, from here you can do the Refund, Void, Re-print and Email the receipt.
9.1 To goto the Activities, tab the icon at the bottom.
9.2 Here is the Activities page, you can review the transaction details by selected record.
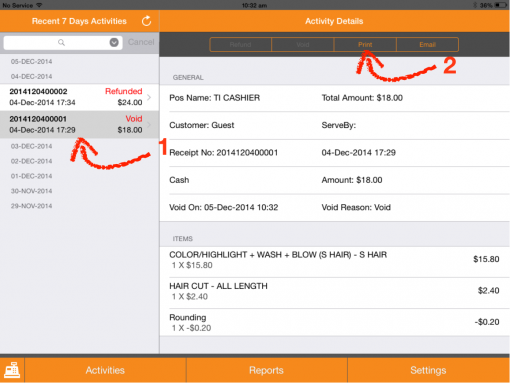
10.0 How to re-print receipt?
To re-print the receipt, please follow the below steps:
10.1 Select the transaction.
10.2 Tab on the ‘Print’, the receipt will be printed from the Cashier Printer.
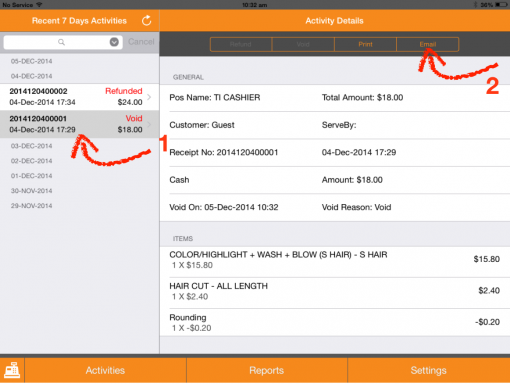
11.0 How to re-send email receipt?
To email the receipt, please follow the below steps:
11.1 Select the transaction.
11.2 Tab on ‘Email’.
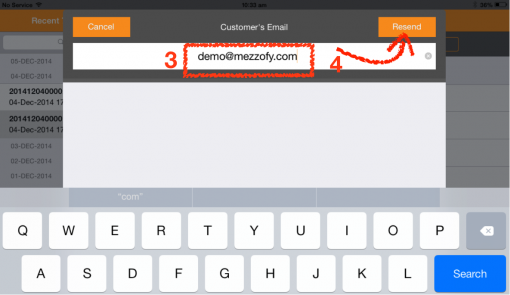
11.3 Enter the email address.
11.4 Tab on ‘Resend’, the electronic receipt will be sent to the recipient.
Cash Management
12.0 How to start a new shift?
To start a new shift, please follow the below steps:
12.1 Tab the icon at the bottom.
12.2 Tab the ‘Reports’
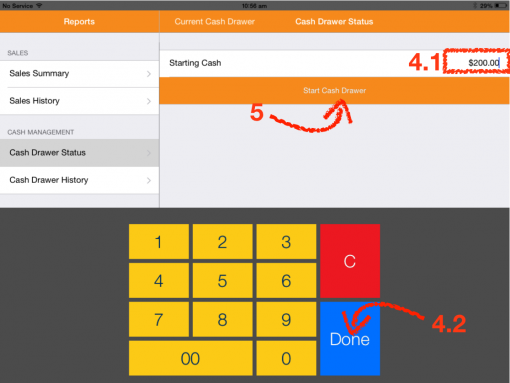
12.3 Goto the CASH MANAGEMENT and tab the ‘Cash Drawer Status’.

12.4 If you want to change the default Starting Cash amount, you can tab on the Starting Cash Amount and change the amount, then tab ‘Done’.
12.5 Tab on the ‘Start Cash Drawer’.
12.6 Now you are ready to start the transaction.
You might also want to see:-
How to close/end the shift? How to enable/disable the cash management? Top 13.0 How to close/end the shift?
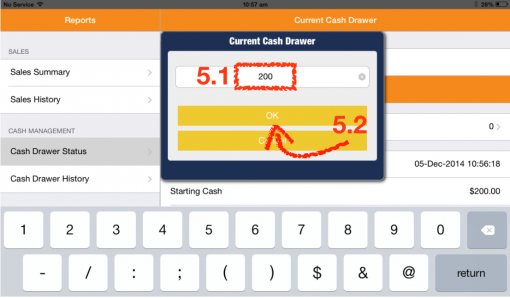
To end the shift, please follow the below steps:
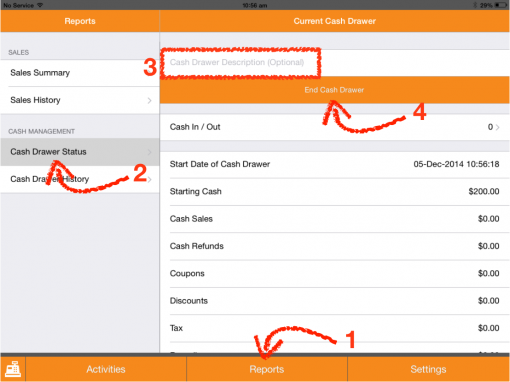
13.1 Tab the ‘Reports’
13.2 Goto the CASH MANAGEMENT and tab the ‘Cash Drawer Status’.
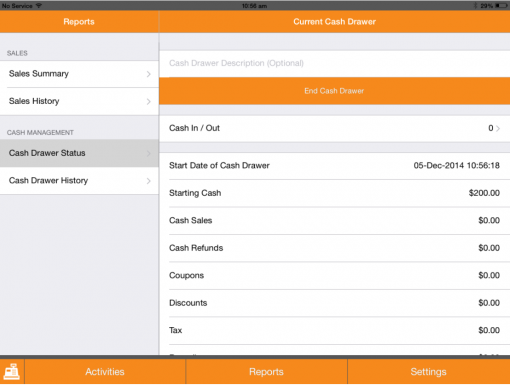
13.3 Enter the Description (Optional).
13.4 Tab on the ‘End Cash Drawer’.
13.5 Enter the actual counted cash amount in the Cash Drawer, tab ‘OK’ to end the shift. Shift Closing Report will be auto printed from the Cashier Receipt Printer.
How to start a new shift? How to check and re-print shift closing report history? How to enable/disable the cash management? Top
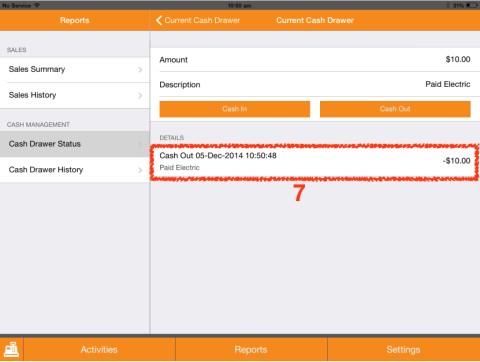
14.0 How to do cash in/out from cash drawer?
To cash in/out from cash drawer, please follow the below steps:
14.1 Tab on the ‘Reports’.
14.2 Goto the CASH MANAGEMENT and tab the ‘Cash Drawer Status’.
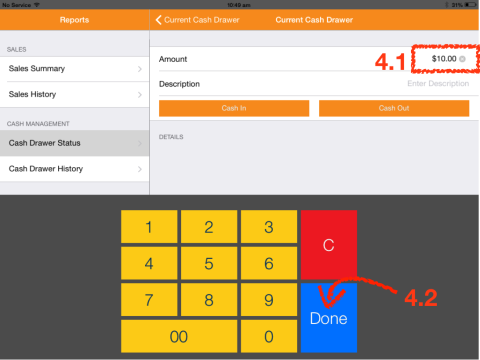
14.3 Tab on the ‘Cash In/Out’.
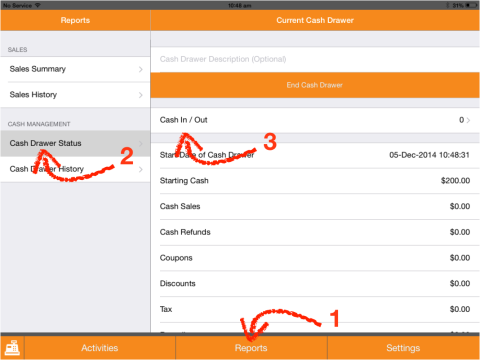
14.4 Enter the amount you would like to put in/take out from the cash drawer and tab on ‘Done’.
14.5 Enter the description for the activity.
14.6 Tab on the ‘Cash In’ if you are going to put in the cash, else tab on ‘Cash Out’ for taking out cash from Cash Drawer.
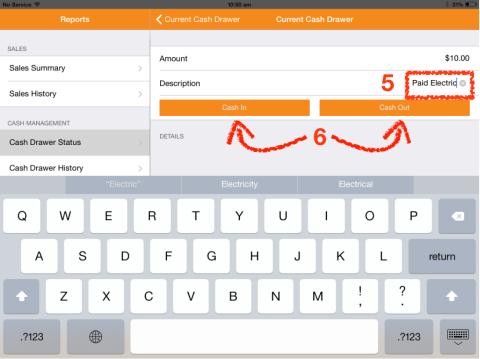
14.7 Record will be appear in the details list.
You might also want to see:-
How to start a new shift? How to close/end the shift? How to enable/disable the cash management? TopReports
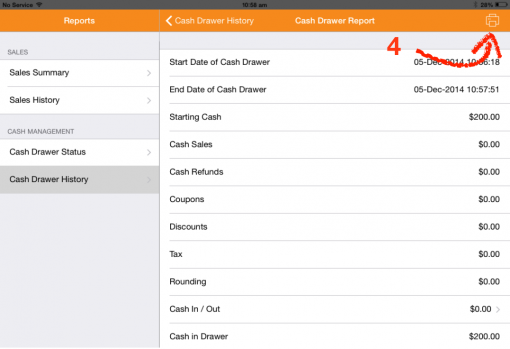
15.0 How to check and re-print shift closing report history?
To reprint the Shift Closing Report, please follow the below steps:
15.1 Tab on the ‘Reports’.
15.2 Goto the CASH MANAGEMENT and tab the ‘Cash Drawer History’.
15.3 Select the record from the list.
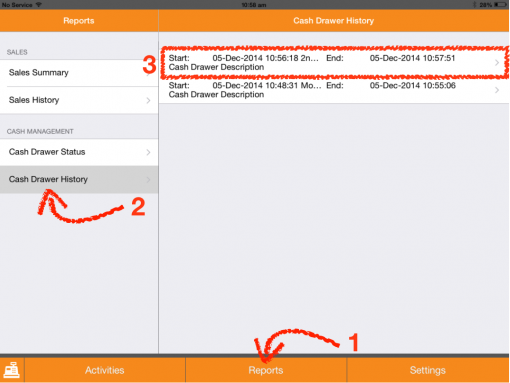
15.4 Tab on the icon at the top right corner, the report will be printed from the Cashier Receipt Printer.
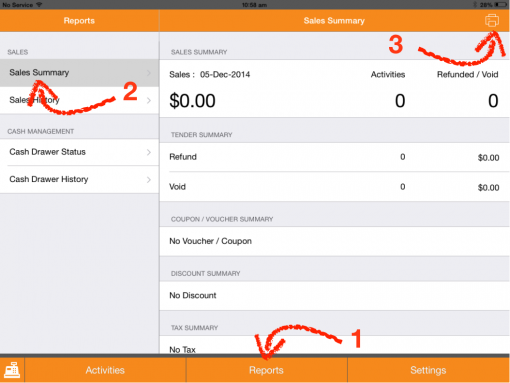
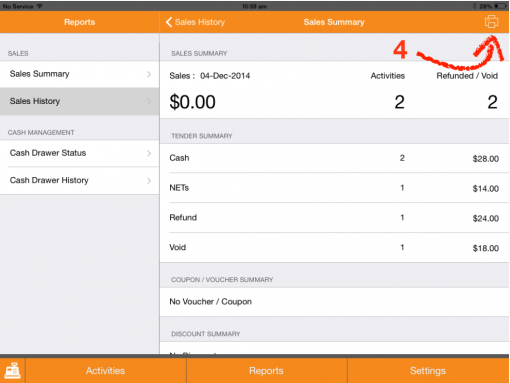
16.0 How to print daily sales report?
To print the Daily Sales Report, please follow the below steps:
16.1 Tab the ‘Reports’
16.2 Goto the SALES and tab on the ‘Sales Summary’.
16.3 Tab on the icon at the top right corner, the report will be printed from the Cashier Printer.
17.0 How to check daily sales history?
To view/reprint the Sales History, please follow the below steps:
17.1 Tab on the ‘Reports’.
17.2 Goto the SALES and tab on the ‘Sales History’.
17.3 Select the record from the list.
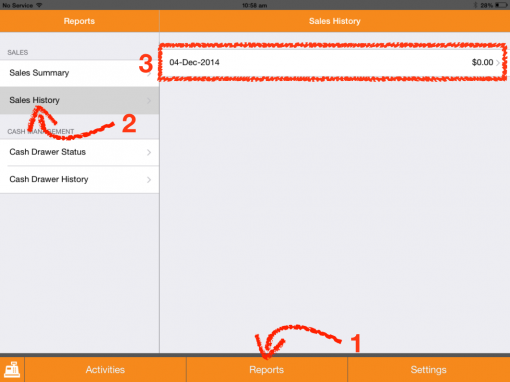
17.4 Tab on the icon at the top right corner, the report will be printed from the Cashier Printer.
You might also want to see:-
How to check and re-print shift closing report history? How to print daily sales report? TopSettings
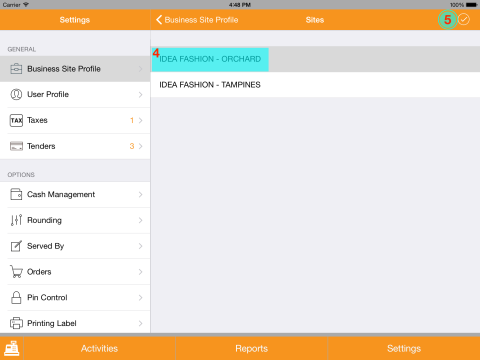
18.0 How to change the business site?
To change the business site, please follow the below steps:
18.1 Tab on the ‘Settings’.
18.2 Goto the GENERAL and tab on the ‘Business Site Profile’.
18.3 Tab on the Site Name.

18.4 Select the site you want to change.
18.5 Tab on the icon at the top right corner to update the setting.
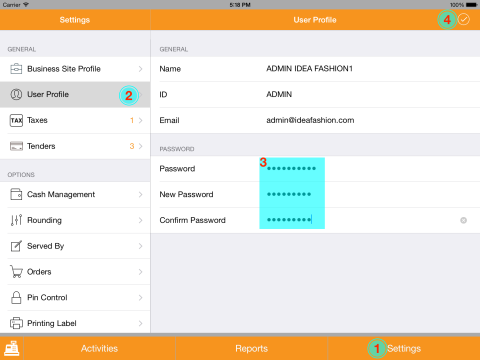
19.0 How to change the account password?
To change the account password, please follow the below steps:
19.1 Tab on the ‘Settings’.
19.2 Goto the GENERAL and tab on the ‘User Profile’.
19.3 Make sure you enter the current account password correctly, then enter the new password and confirm password
19.4 Tab on the icon at the top right corner to update the setting.
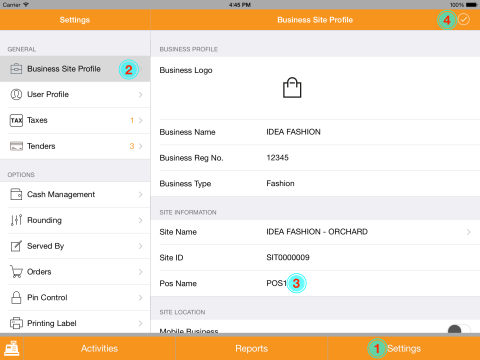
20.0 How to add/change the Pos Name?
To add/change the Pos Name, please follow the below steps:
20.1 Tab on the ‘Settings’.
20.2 Goto the GENERAL and tab on the ‘Business Site Profile’.
20.3 Tab on the Pos Name and enter/change pos name.
20.4 Tab on the icon at the top right corner to update the setting.
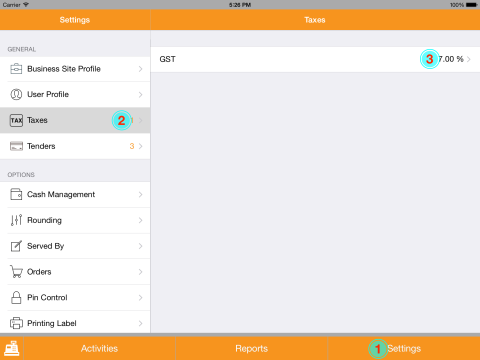
21.0 How to change the tax setting?
To change the tax setting, please follow the below steps:
21.1 Tab on the ‘Settings’.
21.2 Goto the GENERAL and tab on the ‘Taxes’.
21.3 Tab on the tax you would like to change.
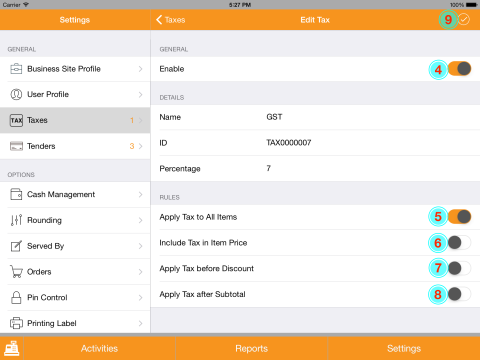
21.4 You can enable/disable the tax using toggle on/off button.
21.5 Enable the ‘Apply Tax to All Items’, if most of your items are taxable.
21.6 Enable the ‘Include Tax in Item Price’, if your items price already tax inclusive.
21.7 Enable ‘Apply Tax before Discount’, if you want to calculate the tax amount before any applied discount if there is.
21.8 This setting main for multi taxes in system, e.g. GST, Service Fee, etc. Enable ‘Apply Tax after Subtotal’, if you want to calculate the tax amount base on the subtotal of the whole bill which include other taxes amount.
21.9 Tab on the icon at the top right corner to update the setting.
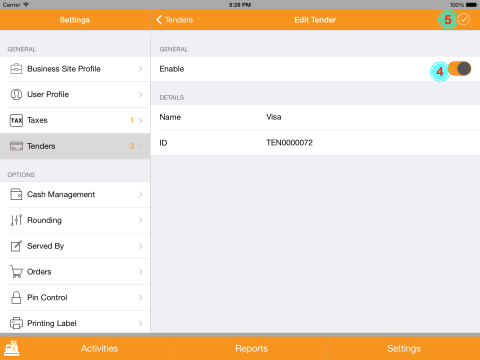
22.0 How to enable/disable the tender/payment mode?
To enable/disable the tender/payment mode, please follow the below steps:
22.1 Tab on the ‘Settings’.
22.2 Goto the GENERAL and tab on the ‘Tenders’.
22.3 Tab on the tender type you would like to change.
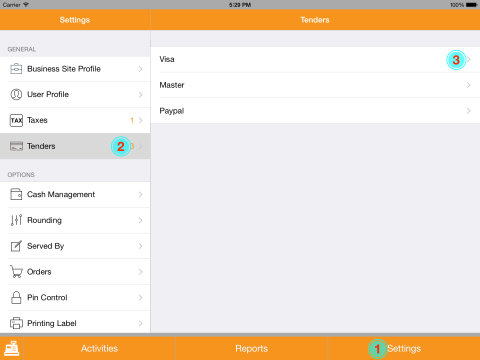
22.4 You can enable/disable the tender type/payment mode using the toggle on/off button.
22.5 Tab on the icon at the top right corner to update the setting.
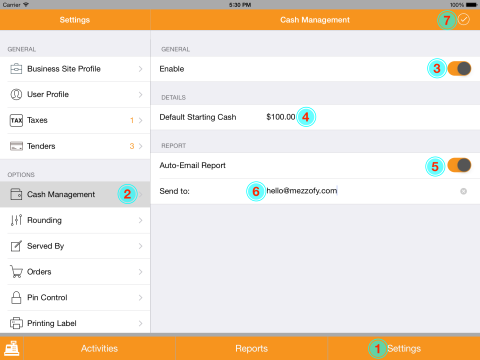
23.0 How to enable/disable the cash management?
To enable/disable the cash management, please follow the below steps:
23.1 Tab on the ‘Settings’.
23.2 Goto the OPTIONS and tab on the ‘Cash Management’.
23.3 You can enable/disable the cash management using the toggle on/off button.
23.4 Enter the default starting cash amount for cash drawer.
23.5 You can enable/disable to send the shift opening and closing report automatically. (Note: Internet connection is required.)
23.6 Enter the email address to be sent. You can send to multi email using “;” in between the email addresses, e.g. abc@abc.com;def@abc.com.
23.7 Tab on the icon at the top right corner to update the setting.
You might also want to see:-
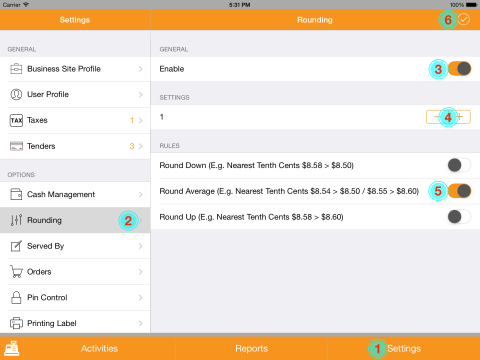
How to start a new shift? How to close/end the shift? How to check and re-print shift closing report history? Top 24.0 How to change the rounding setting?
To change the rounding setting, please follow the below steps:
24.1 Tab on the ‘Settings’.
24.2 Goto the OPTIONS and tab on the ‘Rounding’.
24.3 You can enable/disable the rounding using the toggle on/off button.
24.4 Use the -/+ to set the rounding digits.
24.5 Toggle on the rule you would like to apply.
24.6 Tab on the icon at the top right corner to update the setting.
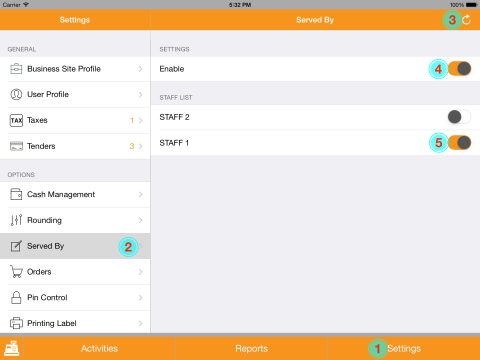
25.0 How to change the serve by setting?
To change the serve by setting, please follow the below steps:
25.1 Tab on the ‘Settings’.
25.2 Goto the OPTIONS and tab on the ‘Served By’.
25.3 Tab on the icon at the top right corner to refresh and get the updated staff list from backend.
25.4 You can enable/disable the Served By using the toggle on/off button.
25.5 Toggle on the staff from the list you would like to track.
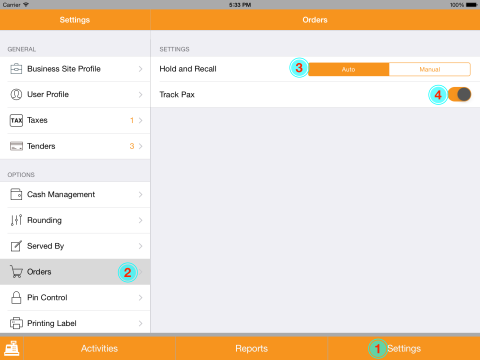
26.0 How to change the order setting?
To change the order setting, please follow the below steps:
26.1 Tab on the ‘Settings’.
26.2 Goto the OPTIONS and tab on the ‘Orders’.
26.3 You can select auto or manual assign the order/table number when holding the order.
26.4 You also can track the Pax/customer count using the toggle on/off button.
27.0 How to manage the Pin control for certain module access?
To manage the Pin control for certain module access, please follow the below steps:
27.1 Tab on the ‘Settings’.
27.2 Goto the OPTIONS and tab on the ‘Pin Control’.
27.3 Tab on the icon at the top right corner to gain the access.
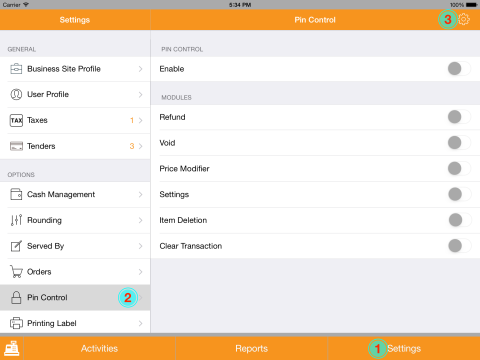
27.4 Enter the 4 digits Control Pin which you can get it from backend.
27.5 Tab on the ‘Ok’.

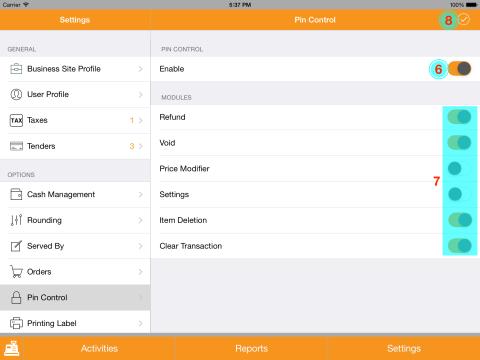
27.6 You can enable/disable the Pin Control using the toggle on/off button.
27.7 Toggle on the modules from the list you would like to control the access. Take note for those turned on module, every time when user trigger it, system will prompt for the 4 digits Control Pin to access.
27.8 Tab on the icon at the top right corner to update the setting.
28.0 How to sign out the system?
To sign out the system, please follow the below steps:
28.1 Tab on the ‘Settings’.
28.2 Tab on the ‘Sign Out’.
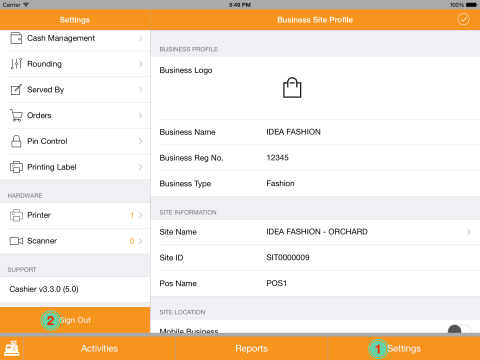
28.3 Sign out successful and ready for next Sign In.